Bronzer has long been a popular product on beauty shelves the world over. No makeup bag is complete without this industry staple. It is one of the most intelligent ways to achieve a natural, kissed-by-the-sun tan without the dangers of baking poolside for hours and hours. With the right bronzer, tool, and application technique, you can step out looking radiant and fresh.
One of the first steps in achieving the perfect bronzed look is making sure your base is ready. If you’re going for a heavier hand when it comes to bronzer, you don’t want to layer your face up with foundation. Instead, opt for something soft and glowy — like a tinted primer.
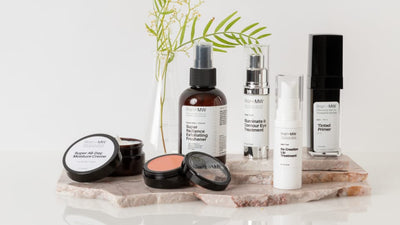
With its sheer liquid formula, my TINTED PRIMER will not only give your blush and bronzer a base to stick to, but will also provide enough coverage to make your complexion look healthy and even. Sheer and light, my tinted primer comes in five different shades.
How to Apply Bronzer
Now that your base is set with a lightweight layer of tinted primer, follow these three easy steps when it comes to choosing and applying bronzer:
-
Choose the Right Shade
Unfortunately, it’s all too easy to look orange or just plain dirty when you use bronzer. Choosing the right shade for your skintone is the most important step when selecting a product that will work well with your coloring and texture. Make sure you never go more than two shades darker than your skin tone.
Bronzers come in three main types of undertones: peach, pink, and yellow. You’ll want to match your bronzer to your undertone.
-
Choose the Right Formula for Your Skin
Drier skin types will want to go for a cream or liquid bronzer to disguise any dry patches and to give your skin some added hydration.
If you have skin that tends to get oily or shiny throughout the day, you’ll want to invest in a powder-based bronzer. A liquid or cream will sip and slide all over your face throughout the day. The Brian M+W MINERAL BAKED BRONZER SOUTH COAST is great for all skin tones and perfect for normal to oily skin. A medium golden brown, my baked bronzer is infused with jet-milled pigments to give you a smooth satin finish.
Perfect Bronzer Application
-
Where to Apply Bronzer
When applying bronzer, it’s so easy to accidentally suffuse your entire face with color. Avoid big fluffy brushes — they won’t allow you to be precise in your application. And bronzer is all about precision! Bronzer will look best when you apply lightly to all the areas the sun would naturally hit:
- Temples
- Cheekbones
- Nose
- Chin
Achieving the perfect bronze skin is all about blending. Apply first in a “C” shape along your cheekbones up toward your temples. The key is to blend, blend, and blend a little more. Especially when it comes to the nose area. You don’t want to overdo it and end up looking like a street urchin from a Charles Dickens novel.
Pro Tip: If you’re on the paler side, don’t forget to add a little bronzer to your ears and neck! You don’t want these features to stand out in stark contrast to your beautifully bronzed complexion.
Don’t forget to add a little blush! Many makeup artists will stop at bronzer and forget blush all together. Bronzer by itself can look rather dull. You’ll want to add a little bit of a natural flush to your cheeks to give your face some dimension. My CHEEKY GLOW CREAM BLUSHES are perfect for a fresh-faced subtle glow. With a buildable formula, my blushes can take your look from subtle to sultry with just a few swipes of your fingertips.
Step into summer looking glowy and gorgeous by learning how to apply bronzer the right way! Best worn on days when the rest of your makeup is light and fresh, the right bronzer will make it look like you’ve spent all day lounging on the beach — without the harmful UV rays!